This memoir, which covers essentially the 10 or so years that Rushdie was under threat of death from a Muslim fatwa, is almost painfully honest. I'm not sure Rushdie is someone I would want to know, but I loved his memoir. The everyday details of how he had to live, the emotions he felt (even the petty stuff), his personal & professional relationships, struggles to continue writing good fiction -- it's all there.
The book IS written in the third person which causes some minor hiccups. When Rushdie switches from "he" meaning some other person to "he" meaning himself, it is not always clear. Towards the end of the book he begins to refer to himself as "Mr. Anton," and this helps a lot.
The four wives (yes, FOUR!) are offputting, no question. But how that all transpired is just part of who Rushdie is as a person. Great writers are not necessarily great people.
Although 600+ pages long, the book was an easy and quick read.
There is a far more detailed (and far better) review by Zoe Heller at the New York Review of Books website
EDITED 2/19/13 TO ADD: I have since read Rushdie's "The Enchantress of Florence and absolutely hated it. Gave it a mere one star on Goodreads (I am ritamarie949 on Goodreads, just as on Twitter)and attempted in the review to figure out what exactly about it didn't work for me. Perhaps it was simply too macho for this extremely devout feminist.
Monday, December 3, 2012
Salman Rushdie's JOSEPH ANTON
Sunday, September 23, 2012
Learning to Crochet
In the few intervals between heat waves this summer, I've been teaching myself to crochet. I've long known how to do single and double crochet as an edge on knitting, but all else was a mystery. So I pulled out my handy needlecraft book and got at it. Below is my best effort.

It took four tries to get this right. The actual motions of creating a stitch are easy. The difficulty is in counting and keeping track of stitches (heh, just like knitting). Apparently a "chain" is not the same as a "stitch." Except, of course, when you chain two or three at the end of a row; then all those chains together make one stitch. Yikes!
Anyway, it's being fun. I hope to crochet an actual something in the fairly near future.
What's been taking up my time and keeping me away from fiber is pictured below.

Yep. A DVD from The Teaching Company with 36 lectures on Cosmology. Fascinating. Terrific professor too. And then, of course, I had to go read a few books about particle physics. It's taken a few months, but soooo worth the time. And now on Twitter I follow a few telescopes and satellites and "hadron colliders" (CERN). It's wonderful to be able to understand their activities and discoveries.
Tuesday, June 26, 2012
In Which I Discover Oshibana
No, Oshibana is not an obscure fiber technique. Nothing to do with knitting, spinning, or any other fibery fun. Actually it's an art form that uses flowers and leaves, rather than wool -- defined in the dictionary as "the ancient Japanese art of making pictures with pressed plants." Sometimes it looks like this –


Of course this leads me to wonder if anyone has ever used yarn or fiber to make pictures. I know we incorporate pictorial motifs into knitting, crocheting, weaving, etc. But could one use actual fiber, arranged and glued down in some fashion, to create a picture? Could it be done? Or is this one of those things that should not be attempted?
Thursday, May 24, 2012
And So It Begins

For the third time in the past year I have been granted the opportunity to play host to a dove family. Apparently they really like the flower boxes on my second-floor balcony – private, secluded, and safe, with lots of soft greenery.
It really starts with the "house hunting." Cooing activity in the trees outside is followed by flying visits to the three different boxes, a considerable amount of tromping about and pecking, and then the final selection of the perfect box and construction of the nest. This process takes three to five days, during which both doves come and go. I usually know that the eggs have been laid when I see a dove sitting in the box every single day. The parents take turns, generally doing "shift change" in mid-morning and early evening.
And then two weeks later–

I took the above picture right after the first chick had hatched, while the parent was off disposing of the shell. S/he flies off some distance to get rid of the shell, so as not to reveal anything to potential predators, I suppose.
It's fun to watch the feeding process – very efficient. Each chick pokes its tiny beak into the side of the larger parental beak, and the parent urps up the, uh, food. So, both kids are fed at the same time. The first week is the same as for any baby: eat, sleep, eat, sleep, eat, sleep, with a whole lot of growing going on. They're four days old in this picture.

Here they are at seven days old. Feathers are coming in; they're tons bigger and look like real birds.

Here's Mom (or Dad, can't tell which) with the kids at the two-week point. They left the nest the following day.

They got out of the nest, flapped around a bit, and then settled into this saucer to recuperate.

And here's one of the very-grown-up-looking chicks, who flew all the way over to the steps. Lookin' good! Notice how well s/he blends into the background?

Although I hate to see all the plants withered and trampled at the end of the four weeks, it's fun to watch the kids grow up. And as an extra bonus the chosen flower box is extremely well fertilized; the replacement plants grow lush and tall.
Monday, April 23, 2012
A Felting Virgin No Longer
 Having finished my Adult Surprise Jacket -- which turned out amazingly well, and I'm delighted with it – and having decided while knitting it that I would NOT lengthen the sleeves, but simply leave them at the elbow, I found myself with one skein of each color left over. Oh, what to do?
 I wound up with this massive boot. Would it really felt down into something that would fit my foot? Hard to believe.
 The colors worked out well. Not having enough of any one color to make the two slippers match, I settled for a "coordinated" look. (The pattern calls for four squares of the main color and two squares each of the other two colors. )
Monday, March 12, 2012
Fiber Art
One of our local community colleges recently had an exhibit of "fiber arts." Of course I had to go take a look at it. And was I ever glad I did!
It was a small exhibit, no more than 30-40 different items. But the stars were the quilts. Although I don't quilt and know next to nothing about quilting, I've always enjoyed visiting quilt exhibitions. It's so intriguing to see what quilters can do with both traditional designs and innovative approaches. But I've NEVER seen any like these.
This one is called "Behind the Line" and it was created in response to the Oklahoma City bombing.

 Check out all the different fabrics used to create this child's face.
  And this one.

 And a fish closeup. Isn't it amazing how the stitching creates both the plants and the water swirls as well?
 There was one other work of art that was not exactly fiber, but definitely crafty. This life-sized lady is made entirely of wee tiny beads.

 Here's a closeup of a symbol from her upper right arm. Can you imagine how long it took to create the entire . . . um . . . sculpture? I like it. Don't know why, maybe it's the playful aspect.
Tuesday, February 28, 2012
Endless I-Cord
I have finally begun the finishing process for an Adult Surprise Jacket on which I had completed all the knitting at least nine months ago. Why did I wait so long? Oooh, now I remember. I had decided to do an i-cord bindoff, then do applied i-cord along the shoulders and sleeve cuffs, and the sew the shoulders together.
Just like the original Baby Surprise Jacket, by the time you are done knitting the adult version the ENTIRE sweater is crowded onto a 60" circ; this includes both front edges and the bottom edge all the way around. Here's a pic of a Baby Surprise Jacket right before binding off.

So yesterday I began the bindoff, working on it pretty much all day and into the evening. And here is where I was at the end of the day – down one front, all the way around the bottom, and part way up the other front.

It is an extremely slooooow process.

Time for a few rousing choruses of "We Shall Overcome."
Tuesday, January 24, 2012
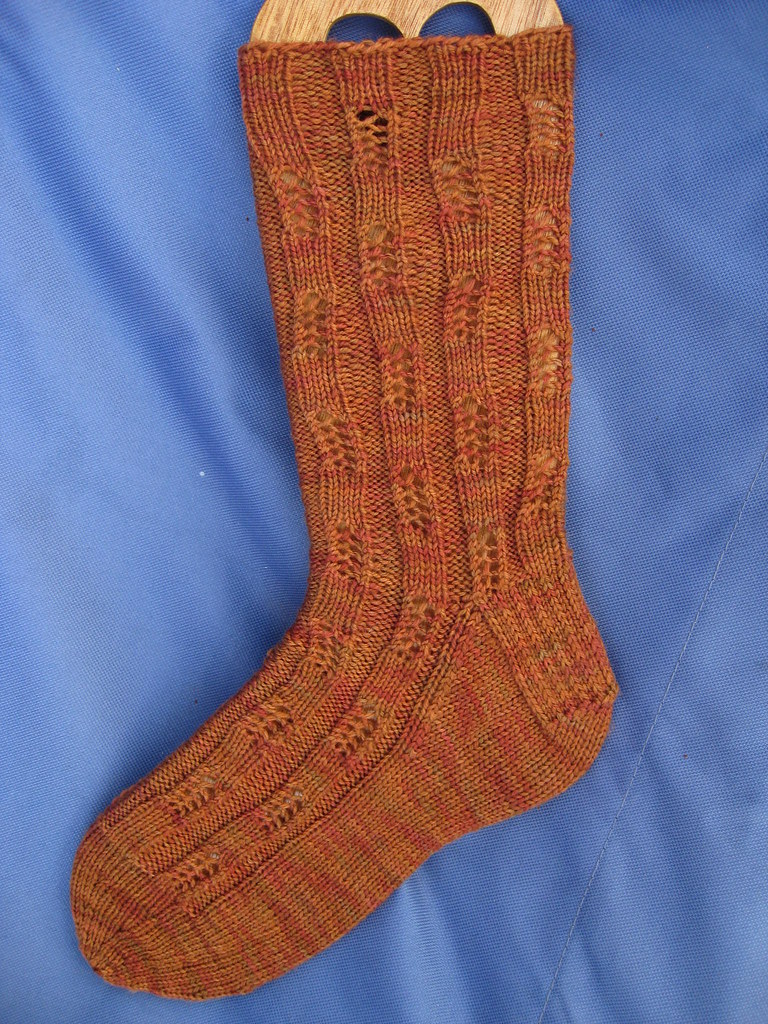
In Which I Discover the Band Heel
I've been knitting a mosaic sock pattern (Diamond Mosaic from Charlene Schurch's "More Sensational . . . " book) and wanted to continue the pattern all the way down the foot. This is, of course, next to impossible if one prefers the traditional flap-and-gusset heel. The additional gusset stitches and subsequent decreases are an insurmountable problem. The patterns in the book are no help; they avoid the entire issue by showing the patterning only on the leg.
 Another option, which I used on my first pair of mosaic socks, is to transition into a pin stripe on the foot. Negotiating the two colors through the gusset decreases requires a bit of attention, but it's not too difficult.
  The obvious solution is a short-row heel. No gusset, no worries. But I had used that heel on these socks a few years ago and didn't like it at all. Something about the shape and/or sizing of the short-row heel just doesn't fit my feet well. Luckily the same book that had the pattern for the "Ukrainian Socks" (Nancy Bush's "Folk Socks") has a HUGE section on heel and toe variations. And that's where I discovered the band heel.
  I'm still trying to figure out how the magic happens, but I followed the directions and it worked. You start out with an ordinary heel flap on half the stitches (in this case 30). Then life gets interesting. You do just a few decreases on either side of the six-stitch "band". Okay so far. But then . . .
  While doing short rows to turn the heel you maintain the six-stitch band in the middle. For some reason I don't yet understand this causes the heel turn to be much longer than usual and you have far fewer stitches than usual left at the end – only the band, actually.
  Thus, when you go to pick up all the necessary stitches along the side of the flap, there are no extra stitches that need to be decreased away – just the original 30. When next I use this heel I would do one thing differently – four stitches, instead of six, for the band. It seems the fewer stitches you have at the end of the heel turn, the more you can pick up, and thus the longer can the heel flap be. And I like looong heel flaps.
 But it all came out well enough. The first sock is done, with a star toe at the end -- using both strands of yarn, since I have been reminded recently of the fragility of sock toes (see prior blog post). All that remains is to knit one more.